0 ratings
Replace Honeywell T6360 with Heatmiser PRT
I have a house built around 1990 and when built it had one of the most common heating systems in the UK. The system consisted of a gas boiler, a hot water cylinder and radiators in each room. It had a time clock with separate timers for the hot water and the heating and a single thermostat to regulate the temperature of the rooms in the house.
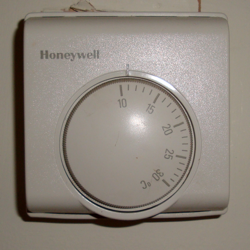
The original thermostat was a Honeywell T6360B that was probably as old as the house and is as basic as you can get. To be fair it had been reliable and it continued working correctly until I replaced it in late 2012 so I cannot complain about it. The problem I had with my old system is that it was not easy to control and did little to optimise the amount of gas it used.
The original thermostat was a Honeywell T6360B that was probably as old as the house and is as basic as you can get. To be fair it had been reliable and it continued working correctly until I replaced it in late 2012 so I cannot complain about it. The problem I had with my old system is that it was not easy to control and did little to optimise the amount of gas it used.
The system only allowed for a single temperature setting so if I wanted to change it I had to adjust the thermostat. I work from home so when everyone else left for the day I turned the temperature down. Then I had to remember to turn it back up again before they returned home in the evening. If I got called out, they sometimes came home to a colder house.
Another problem I had is with the amount of time it took to warm the house up, especially in the morning. If it had been a mild night then it did not take very long for the house to get to the desired temperature. If it had been a cold night then it could take the system a lot longer. I could set the timer to start early enough for the coldest night and then the house would always be warm enough when we woke up in the morning.
The trouble with that approach is that it wastes gas all the time the boiler is coming on earlier than it needs to. If the weather changed slowly and predictably then it would be OK as the timer would not have to be changed very often. Unfortunately, I live in the UK and the weather is unpredictable and changes very frequently. So I would have to change the timer frequently and that is not very practical.
After much research I finally decided to replace the Honeywell thermostat with a Heatmiser Programmable Room Thermostat (PRT). The Heatmiser is a modern digital thermostat with an Liquid Crystal Display (LCD) that has the two functions I needed.
The Heatmiser PRT has a programmable 5/2 or 7 day timer with four different temperature settings. So I can set it to be at 20c at 07:00 and then drop down to 17c at 09:00 then up to 21c at 17:00 and finally drop back to 16c at 22:30. Each day could have different settings as well so it will cope with our changing pattern throughout the week. This means I should no longer need to adjust the thermostat.
It also has a feature called Optimum Start that allows the thermostat to work out when it needs to turn the heating on so that it is at the desired temperature at a specified time. It does this by learning how long the house takes to warm up by a given amount and then calculating the correct start time. This means that the system should use the optimum amount of gas as it will always be turning on at the right time and not to early or late.
So the Heatmiser PRT solved both problems with my old system simply by changing the thermostat. Well perhaps it would not be that simple as I discovered that quite a few people seem to have trouble working out how to replace existing thermostats with the Heatmiser. So lets take a closer look at the Honeywell T6360B and its wiring.
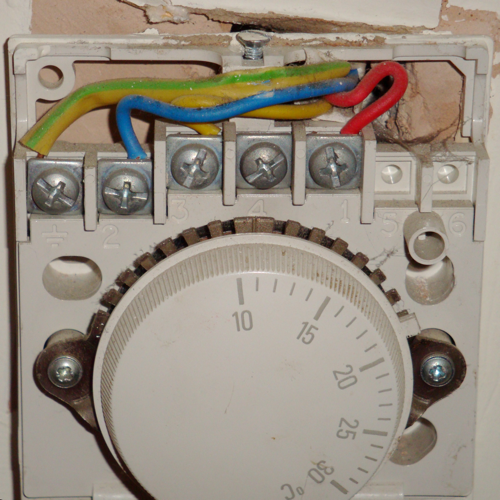
The picture above shows the wiring that connected the Honeywell thermostat to the rest of my heating system. The Live wire (Red) is on terminal 1 and the Neutral (Blue) is on terminal 2. There is a Yellow wire on terminal 3 and this is connected to the Live supply when the thermostat is calling for heat.
The earth wire, Yellow and Green sleeving, is not actually required as the thermostat is double insulated but Honeywell provide a location for it anyway. That terminal is not connected to anything inside the thermostat.
The earth wire, Yellow and Green sleeving, is not actually required as the thermostat is double insulated but Honeywell provide a location for it anyway. That terminal is not connected to anything inside the thermostat.
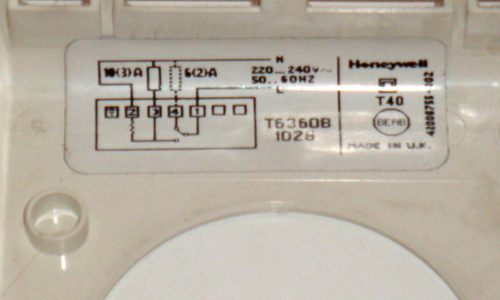
I have also taken a photo of the label that is inside the front cover. This shows the connection diagram as you can see in the photo.
The diagram is not very clear so I have drawn out a larger version in colour to help illustrate how my Honeywell T6360B was connected to my system.
The diagram is not very clear so I have drawn out a larger version in colour to help illustrate how my Honeywell T6360B was connected to my system.
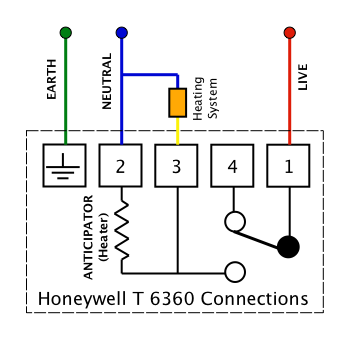
Here you can see how the Honeywell thermometer turned my heating system on and off. When the room is warm enough the switch connects the live supply on terminal 1 to terminal 4 as shown in the diagram. Terminal 4 is not connected to anything so the system remains off.
When the room temperature falls below the temperature set on the thermostat the switch changes and connects terminal 1 (live) to terminal 3. Now terminal 3 has 240 volts on it and this turns the heating system on.
You can see that when the switch connects the live feed to terminal 3 it also provides power for the Anticipator. This is a little heater, often a resistor, that heats the Thermometer Sensing Vessel (TSV) by a small amount. This helps to prevent the TSV from overshooting its set temperature as doing so wastes energy.
Not all mechanical thermostats have an anticipator and in those cases the neutral supply would not be required. So you may have a thermostat that only has a live and switched connection. On my Honeywell this would be terminals 1 and 3.
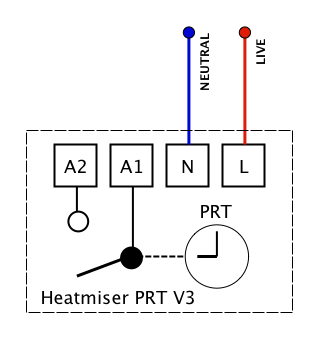
Now look at the connections on a Heatmiser PRT.
When the room temperature falls below the temperature set on the thermostat the switch changes and connects terminal 1 (live) to terminal 3. Now terminal 3 has 240 volts on it and this turns the heating system on.
You can see that when the switch connects the live feed to terminal 3 it also provides power for the Anticipator. This is a little heater, often a resistor, that heats the Thermometer Sensing Vessel (TSV) by a small amount. This helps to prevent the TSV from overshooting its set temperature as doing so wastes energy.
Not all mechanical thermostats have an anticipator and in those cases the neutral supply would not be required. So you may have a thermostat that only has a live and switched connection. On my Honeywell this would be terminals 1 and 3.
Now look at the connections on a Heatmiser PRT.
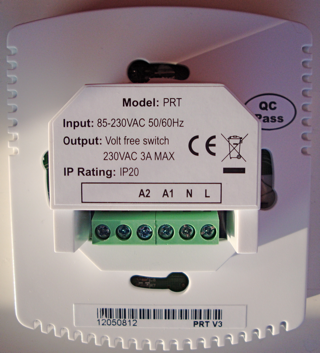

It is clear why so many people find it difficult to see how the Heatmiser can replace the Honeywell. The Heatmiser has a live and Neutral connection as it requires power for its own electronics. There appears to be no connection between the live terminal (L) and the switch terminals A1 and A2. That is because there is not one.
The Honeywell thermostat has three switch connections and the Heatmiser only has two, marked A1 and A2. Terminal 4 on the Honeywell does not exist on the Heatmiser PRT. So at first glance it would appear that the two thermostats are not compatible.
But they are.
To understand why we need to simplify the wiring diagram for the Honeywell T6360 as I have done in the next diagram.
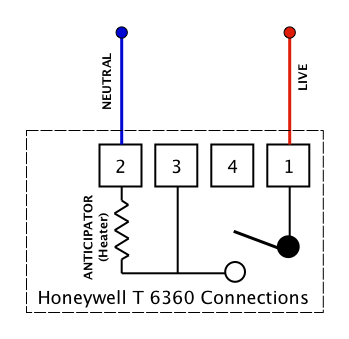
The Heatmiser PRT, like the Honeywell, is double insulated so it has no need for an earth connection. The only difference is that the Heatmiser has no terminal for the earth wire. So I have removed the earth wire from the Honeywell. As terminal 4 is not connected to anything I have removed the switch contact as well. Now the Honeywell diagram looks quite a lot more like the Heatmiser PRT.
Now lets take things a step further.
Now lets take things a step further.
A digital thermostat does not need an anticipator and it has no bearing on how the thermostat switches the heating system so in the diagram above I have removed it. I have also removed terminal 4 from the diagram. Now the Honeywell thermostat looks a lot more like the Heatmiser PRT.
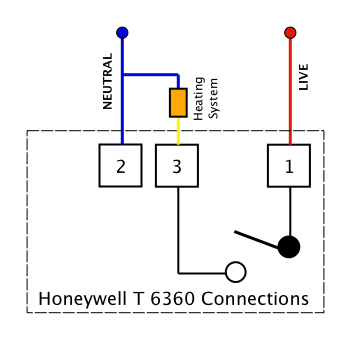
The only difference now is that the Honeywell has a direct connection of live to its switch. That is very easy to resolve as we can see in the next diagram.
The only difference now is that the Honeywell has a direct connection of live to its switch. That is very easy to resolve as we can see in the next diagram.
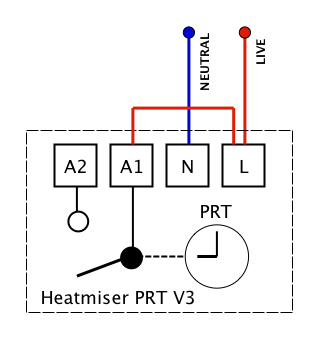
All that is needed is a wire connecting the live terminal (L) to the A1 terminal. Now the Heatmiser will operate in exactly the same way as my old Honeywell T6360B thermostat. The final diagram shows how the Heatmiser PRT can be wired to work in exactly the same way as my old Honeywell thermostat.


My Honeywell thermostat was fitted at about 130cm's above the floor and that is a bit low as the Heatmiser should be at eye level. Of course eye level could be 130cm's for a short person but that would not apply to my family so I need to fit it higher up on the wall. In the UK thermostats are supposed to be fitted 150cm’s above floor level and that happens to be an ideal height for the Heatmiser.
Also the Honeywell was surface mounted but the Heatmiser needed a recessed box. So before I started cutting holes in my wall I connected the Heatmiser PRT to test it and make sure that it worked correctly.
Although my example uses the Honeywell T6360B the information should help you to work out how to replace other three wire thermostats with a Heatmiser PRT or many other types. Please be careful as there is a lot of incorrect information on the web. I found lots of 'experts' who said it cannot be done.
I also found some of the reviews of the Heatmiser PRT a little strange so make sure you read as many as possible and you will see that the majority of users like their Heatmiser.
The documentation supplied with mine could be better but I managed to get it all working. What is really helpful are the videos they have put on YouTube. These are excellent and clearly explain every aspect of the thermostat. You can find them at:
http://www.youtube.com/user/HeatmiserUK/videos
I strongly suggest that you look at them before you try to do anything with the thermostat. Really good as well if you are trying to decide if the Heatmiser PRT is the right choice.
Does it work?
Almost as soon as I had fitted the new Heatmiser Britain had a cold spell that has lasted several weeks. It was an ideal time to see just how well the Heatmiser would work.
The four different temperature settings each day are great and have almost entirely stopped me from having to change the temperature on the thermostat. The few times I have done this it has been because we have been at home at unexpected times and needed to increase the set temperature. Really easy to do.
The Optimum start feature works really well and has been a real boon during any very cold spell. I have just left the thermostat to get on with it and it is surprisingly good at predicting the correct start times. One morning I had set it to have the temperature at 18 degrees at 07:30. It hit this temperature at 07:26 and I think that is fantastic.
Also I doubt if I would have set the old timer to switch the heating on early enough to cope with a few of the really cold mornings we have had. It was about -3 one night and the heating came on pretty early but it needed to. I am really pleased as the Heatmiser has done exactly what I had hoped it would.
The Optimum Start feature is great and on its own has made the purchase price well worth it.
I had completely forgotten about one issue I had when I first installed my new PRT. The old thermostat received its live supply from a time clock that controlled the hot water and the heating. When I installed the new PRT I initially had no display at all and it took me a few minutes to realise why this was happening.
I had to set the heating control to be on 24 hours a day in order to keep the live supply going to the PRT. Many thanks to Colin Fautley who had the same problem after following my instructions. Sorry about that Colin. If you have a similar type of system remember to change your timer after you have installed the new PRT and it should be fine.
If you find this information helpful please drop me an email. It takes quite a lot of time and effort to create these pages and it is always nice to know that they have helped someone to solve a similar problem.
Replace Honeywell T6360 with Heatmiser PRT